 |
Preparatory work on the electrics and plumbing began some three weeks before the delivery date. The old cooker is
withdrawn from its normal position so that the electrical supply can be transferred
to its new place. |
 |
The cabinets are taken away and some tiles are removed so that the 45 amp cable can be moved and hidden. |
 |
Cabling for the extractor unit, the fridge (which is to go where the cooker used to be), the hob ignition and the floor level heater (to replace the traditional radiator) is installed. |
 |
The old radiator is removed and the floor is excavated so that the pipes to the new heater can be hidden. |
 |
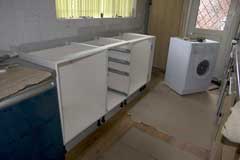
The cabinets arrive and go into the prepared space relatively easily. |
 |
The work surface is in place and the hole for the hob is cut out supported by an old car jack perched on a wooden box so that it won’t fall when finally cut. |
 |
The hole is neatly cut but reveals that the cabinet needs some surgery to accommodate the hob as it is a little bit thicker than the worktop. |
 |
The hob is connected to the new gas supply and works once one gets used to twisting the knobs counter clockwise to light them. |
 |
The oven is connected to the new power supply. It looks too big to go into the hole but slips into place perfectly. |
 |
The old cooker is wrapped in polythene and parked in view of the road to see who will take it first. The Albanians who will use it or the gipsies who will sell it as scrap metal. The gipsies won. |
 |
The oven is in place and the old hatch, not used for several years, is tiled over and made ready for hidden lighting. |
 |
The first of the wall cabinets and the extractor unit are in place. The new fridge is where the cooker used to be. Some plain tiles are removed to accommodate decorative ones taken from places that will be covered by cabinets. |
 |
Most of the doors go on but the worktop is not yet trimmed to size and remains a hazard to anyone who is working low down and gets up unwarily. |
 |
The cooking side of the kitchen begins to take shape and is fully functional. |
 |
The plumbing installed by the builder in 1987 was untidy and inconvenient despite small modifications. Condensation on the cold pipes was a problem as was the need to
access taps to control supplies to the front and rear gardens. As a result, the under-sink cupboard was close to unusable. The main supply came in via a hole in the foundations and nearly
three feet deep. It was subsequently filled with expanding foam. |
 |
The old larder housed the electricity distribution unit and hid the main drainage system. It had been heavily butchered by the builder to accommodate the cables and pipes. Its side panel had been
tiled over some eight or ten years ago to make it look a more permanent structure which was fortunate as it provided a supply of spare tiles for use elsewhere. |
 |
All the main electricity cables and drainage pipe are exposed. |
 |
All the under-sink plumbing is removed and replaced as compactly as possible at the back of the washing machine’s space. Any condensation is therefore removed outside the under-sink cupboard. |
 |
The pipes and cables behind the larder are rearranged so that the new larder fits in with only minor butchery none of which impinges on the inside of the cupboard. It takes a mere four hours to
wiggle into position with everything that should be horizontal or vertical exactly that. It takes another few hours to reconnect the electricity distribution unit. |
 |
The cold water pipes going to and from the water softener are enclosed in 32mm plastic pipe and centred within them with plastic supports and then filled with expanding foam fed in from small
holes drilled into the pipe. That should thoroughly fix the condensation on those two pipes which run the whole length of the kitchen behind the new cabinets. |
 |
Screwing the cabinets to the wall and to each other is not difficult although as with the other side,
it reveals that the floor goes slightly downhill. |
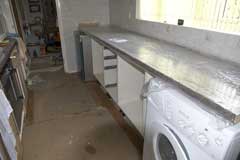 |
The worktop is put in place. Wickes computer fails to notify anyone that it is not long enough to fill the space and will need to be jointed at the far end. In some ways that is good because
cutting it exactly to size to fit between two immoveable walls would not be easy. |
 |
The sink and tap are installed, an operation that required considerable hidden modification to the cupboard as although it claimed to fit within a 600mm cupboard it actually required a full 600mm width
and 600mm cupboards inevitably lose more than 30mm due to the thickness of their side panels. It will take quite some time to get used to the right hand draining board which was chosen to maximise
the uninterrupted length of work surface. |
 |
The under-sink plumbing is minimal with almost no copper pipe visible in the hope of obtaining a big reduction in condensation. The vertical ‘pipe’ hanging between the two main waste pipes is
the box spanner that releases the tap, tied to a pipe so that it doesn’t get lost. |
 |
The doors are put on the cabinets and things are almost back to normal although many finishing jobs still need to be done. |
|
Lots of odd jobs still to be done. Tiling, floor, lights, cornices, plinths and heater to name but a
few. |